Setup a project calendar in Microsoft Project 2016
The primary objective of Microsoft Project is to track the time throughout project life cycle. Therefore it is of primary importance that we correctly setup a project calendar in Microsoft Project so that tasks do not get scheduled on holidays or during non-working time. This will not only help in forecasting right timeline but also deliver on it.
Questions, this post answers:
- How to customize a calendar in MS Project?
- My office timings are different than default setting in MS Project. How can I change them?
- How can I make Saturday as working day?
- How can I setup working and non-working days as per my office calendar?
- How can I set up holidays in my project calendar?
- We work half day on Saturday. How can I change working time on Saturday?
- We work on 1st, 3rd and 5th Saturdays and observe off on 2nd and 4th Saturday. How can I make alternate Saturday working?
- Our weekly off is on Friday. How can I move weekly off from Sunday to Friday in MS Project?
- Many more similar questions
The project calendar in MS Project should reflects normal office working days and hours of the project team. Defining a calendar in Microsoft Project means setting up default working hours in a typical day, marking holidays and defining off working hours.
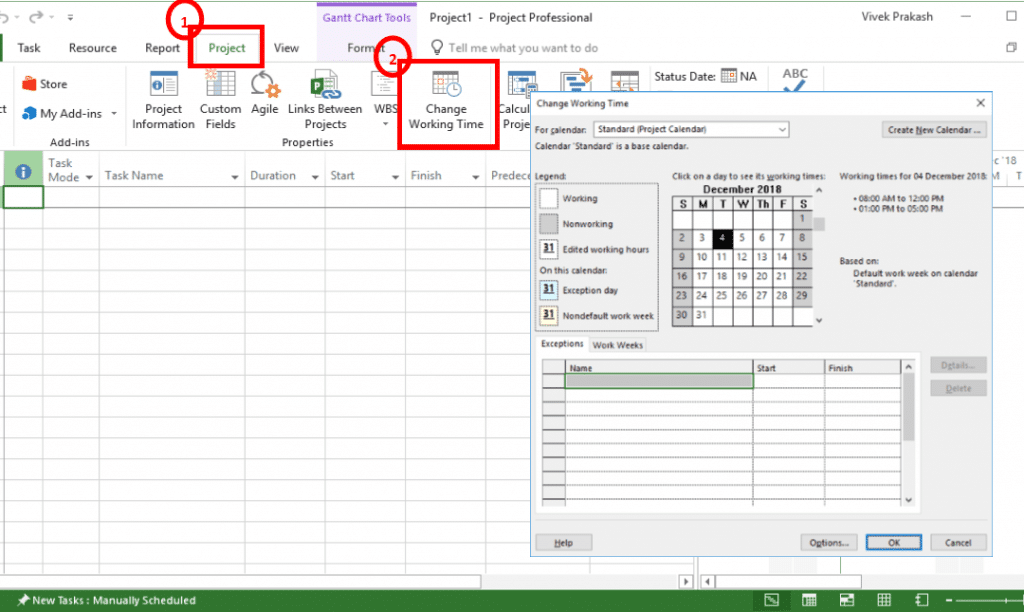
Figure 1 below shows how we can invoke calendar set up functionality. Microsoft team has defined it as change working time.

Figure. 1
Goto to “Project Tab” and click on “Change Working Time”. It will open up “Change Working Time” dialogue box.
Setup a project calendar in MS Project: Change Working Time Overview:
Places refer Figure 2. Left hand side on the top, we see a drop down “For Calendar”. Clicking on dropdown will show up three calendar names. These are called base calendars. Microsoft has provide basic setup of three calendars for three different situations.
- 24 hours – We choose this when work is continuously going on without any break.
- Night Shift – We choose this when working is happening in night from 11:00 PM to 8:00 AM
- Standard – We choose this when work is happening during standard working hours from 8:00 am to 5:00 pm
We observe “(Project Calendar)” written next to “Standard”. This is because MS Project considers “Standard” as project calendar by default. That means all tasks and resources in project will follow this calendar. We will see in the next section how to change default calendar.

Figure. 2
Just below it in the centre, we see a calendar which shows current setup. When we make changes in the calendar, they show up here. Microsoft Project usage different color coding and font style to show deviation from normal working time. This color coding and font styles are explained in a box left to this calendar under “Legend” title. Right to this calendar, we can see selected date on the calendar and working hours on that date.
Below the calendar, there are two tabs:
- Exception: The exception tab is to define working hours and working days different from default settings and which are not regular. For example, we have holiday on 25th December which we do not observe every week. Any deviation form default timing which is not observed every week is defined under exception tab.
- Work Week: The work week tab is to define deviation from default timing which are observed regularly every week. Suppose we work on every Saturday, it will be defined under work week tab.
If we work on alternate Saturday, we defined it under exception tab as recurring exception occurring every month. Any deviation that occurs every month (other than every week), we define it under exception tab as recurring exception.
On the right of “For calendar” drop down, we see “Create New Calendar”. We can use it to create a new calendar all together from scratch. We use this option when our calendar is way different and we do not want to use any of three inbuilt base calendars.
Important Note:-
Please press “OK”, to save your change. Pressing escape at any point of time (even by accident) will discard your changes without warning. Don’t you think Microsoft team should have thought of giving a warning on pressing escape if any changes are made? I am sure, your answer will be yes but currently it is not like that. So keep pressing “OK” (and then “Change Working Time” to come back to this dialogue box) at regular interval to keep your changes safe.
Setup a project calendar in MS Project: Marking a day as holiday:
Refer Figure 3. We are on “Change Working Time” dialogue box. There are two methods to mark a day as holiday (Non-working days).

Figure 3
Method 1:
- Select a date on the calendar (If we are observing holidays on two or more continuous days, drag the cursor to select multiple days)
- Select Exception tab
- Name the holiday under name column on exception tab
- Press Enter or Tab key
- MS Project will automatically take the selected date(s) as start and end dates
Method 2:
- Select Exception tab
- Name the holiday under name on exception tab
- Select date of holiday under start date
- If we are observing two or more continuous days as holidays, we need to select end date as well.
Setup a project calendar in MS Project – Changing regular working days and hours:
We saw how we can mark a working day as holiday in exception tab. This is not what we observer regularly every week. Now we will see how to change our regular (that occurs every week) timing.
Suppose we work half day on every Saturday. Let’s see how we can reflect this in the default calendar. Refer figure 4

Figure. 4
Procedure to change regular timings
- Select “Work Week” Tab
- Select default row
- Click on Details… on the right side. Details for “Default” dialogue box will open up
- Select Saturday under “Select Day(s)”
- Select 3rd radio button on the right side – “Set day(s) to these specific working time”
- Enter 8:00 am to 12:00 pm (or any hours of your choice)
- Click “OK”
We can restrict this change within a certain time period by select start and end dates in the default row on work week tab.
We can override this change by another change for a certain period by creating another row below default row on work week tab. We will get into these details when we discuss calendar separately later. Currently we restrict our discussion to set up a default project calendar.
Setup a project calendar in MS Project – Marking alternate Saturday as working:
Working on alternate Saturday is a recurring pattern but does not occur every week and therefore we cannot use work week tab for this purpose. We will use exception tab. But this change reoccurs, so we will create recurring exception.
Refer figure 5. First we see how we can make 1st Saturday as working day.

Figure. 5
Procedure to make 1st Saturday as working day
- Select “Exception” Tab
- Select a date falling on 1st Saturday (This step is not mandatory but make life convenient)
- Make an entry in exception table with name “1st Saturday Working” (Any name can be given). As we press tab, we see date of 1st Saturday is taken as start and end date automatically.
- Keep above row selected and press “Details…” on the right side. Details for “1st Saturday Working” dialogue box will open up
- Select Working time radio button. By default, normal working hours are displayed in the table below but we can change if we want
- Come to Recurrence pattern and select “Monthly” because 1st Saturday recurs monthly
- On the right, select The “First” “Saturday” of every “1” months. This comes by default because we selected date of 1st Saturday on the calendar.
- Give recurrence frequency – End after “12” Occurrences (we can give any number). Or provide an end date for occurrences.
- Press “OK”
Similarly we can make 3rd and 5th Saturday as working to make alternate Saturday working
There is a lot more in setting up a calendar but we restrict our discussion to setting up a default project calendar. We will explore other calendar options later when we discuss calendar in detail.
The next step from here will be to set up project information before we start creating our work breakdown structure. Project Information will help us to define project start date, default project calendar, select between forward and backward scheduling etc. We will discuss this in next post. Until then, I look forward for your comments and questions.