Microsoft Project 2016 – Basic User Interface
Microsoft Project Professional 2016 (Also applicable to Microsoft Project 2016 Standard) has a very intuitive user interface. It is very similar to other Microsoft Office applications like Microsoft Word and Microsoft Excel. It’s similarity with Word and Excel may be one of the reasons, people think that Microsoft Project can also be used as Excel and they start using it without any proper training and guidance. This leads to adopting bad practices which in turn make people to use this fantastic tool inefficiently and waste their precious time. But here the focus is User Interface and let’s stick to it.
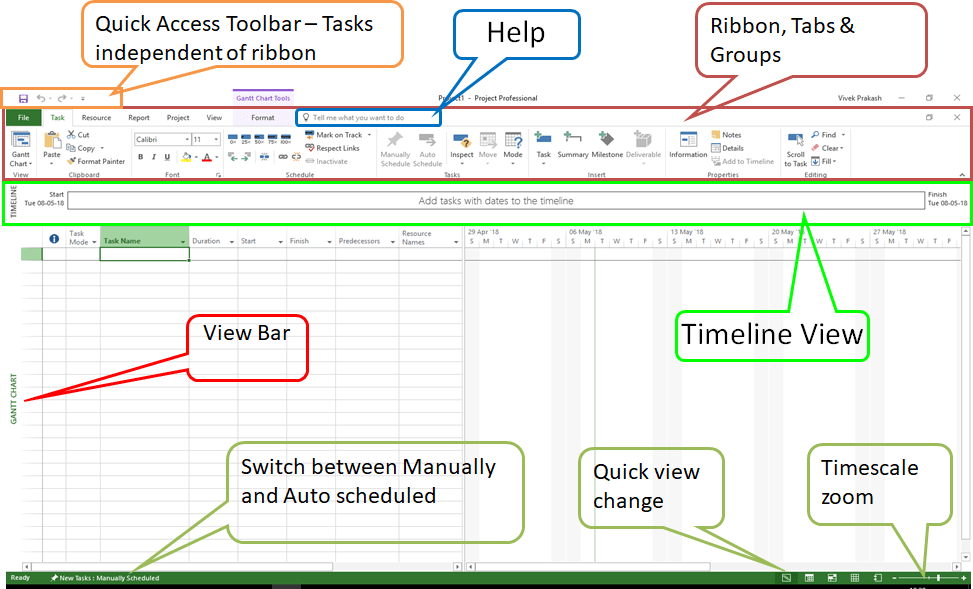
Let us have a look at the following figure below
Quick Access Bar:
Top left corner, you will find Quick Access Tool Bar. On this bar you can add you favorite commands and use them frequently without changing the interface.
Ribbon, Tabs and Groups
Just below it, there is a ribbon similar to Word and Excel. In MS Project, the ribbon has six basic tabs, namely – File, Tasks, Resources, Report, Project, View and Format. Each tab has groups which group the related commands for easy access. For example Tasks tab has 8 groups namely – View, Clipboard, Font, Schedule, Tasks, Insert, Properties and Editing.
File tabs contains file operations on back stage view like Open, Save, Print etc. and some common features like Accounts, Info, Options etc.
Microsoft Project has two major things – tasks to be performed and resource who will perform the tasks. Therefore 1st two tabs after File tab are Task and Resource.
Task tab contains all the commands to act or work upon tasks to be performed like entering new task, establishing dependencies between two tasks.
Resource tab contains commands to act on resources like assigning a resource to a task.
Report tab contains various built-in reports and resources to build a customized report. It will also give access to Visual Reports and a feature to compare two versions of a project.
Project tab contains that mot specific to tasks or resources but apply to complete projects. In general any change using commands in project tab impact all the tasks and resources in the project.
View tab is a little more important. It gives us commands to see the project from various angles. Every view is combination of table, graph, time phased data etc. Like on default Gantt Chart view, left hand side is a table and right hand side is bar chart. There are various views (we discuss in the detail later) to help us to view the project from different angle. Like you can see timeline view just below the ribbon and a Gantt Chart view just below timeline.
Format tab helps us to decorate the project plan, make it more presentable, highlight anything in the plan, change color scheme, make project livelier by adding figures etc.
Help search box
Immediate next to Format tab, there is a help search box. Earlier there used to be a question mark which used to open a help dialogue box. Now in MS Project 2016, direct search box is provide. One can type any search term and it will list direct command itself which you can execute by clicking on it. When it list on your search, the last option in the list is what question mark used to do in earlier version.
Timeline view
Timeline view is one of the view shows a bird eye view of a project. It is part of default view set by Microsoft. You can remove it by unchecking timeline checkbox on View tab. We will discuss about views in a short while.
Main view area
Just below timeline view, we have main view area. In a default view, it is divided into two part. Left hand side is a table which shows data and right hand side is either a graph. The default Gantt Chart view shows task name, duration of each tasks, start and finish dates, predecessors and resource name in the table on left hand side while right side shows a bar graph called Gantt Chart.
On the extreme left, there is view bar which shows name of the current view. As discussed above there are several views to show the different project data from different angle. Depending upon view selected, layout of main view area main change. Some views have only a table, some views have table and graph and some views have table and time phased data. Table is always on left hand side.
Status bar
On the extreme bottom, there is a status bar. It is called status bar because it was originally meant to show current status. We can see the status left bottom corner. Most of the time, it is “Ready”. Now it also provides quick access to few commands.
First one is a switch between manually scheduled and auto scheduled tasks. You can switch from manually to auto and vice-versa. It applies only to new tasks which will be created after this switch. If you want to switch existing tasks manually to auto and vice-versa, you either use Task Mode column or Manually Schedule and Auto Schedule commands available on Task tab.
Second one is View shortcut. It is on the right hand side on the status bar before timescale zoom. Using this, we can switch between few frequently used views quickly.
Third one is Timescale zoom, using timescale zoom, we can adjust right hand side of the main view which is either a graph or time phased allocation. Using this feature, you can zoom in or zoom out to adjust the graph or time phased allocation to a time period you would like to focus. We can zoom out to see complete plan or zoom in to focus on to a specific month or even week.
As we go further we will go into details of each of these components but let’s summarize this Microsoft Project 2016 Basic User Interface here.

Please refer the numbers in the figure above while reading following summary.
- Main View Area
- 1.1 Table containing data relevant to current view
- 1.2 Graph relevant to current view
- View Bar – Displaying name of current view
- Ribbon, Tabs and Groups – Displaying Tabs and Group within tabs on command Ribbon.
- Timeline View – Displaying a bird eye view of the project. It is optional and can switched on or off.
- Quick Access Toolbar – Displaying frequently used commands. Customize it to reduce frequency of switching between tabs and backstage view.
- Zoom Slider – Zoom in or out the time scale portion to see the complete plan or focus on specific time period.
- View Shortcut – Quickly Switch between frequently used views
- Task Mode Switcher – Switch between auto or manually scheduled mode for tasks to be created in future.
- Help Search Box – Get help on Microsoft Project 2016